
I started my blog project using GitHub Pages about two weeks ago. I always wanted to have my own website but I did not have a motivation to do so for a while. All the fun of daily ‘struggle & learn’ began once I made up my mind to finally do it.
So, below are the decisions made and actions taken to get to where I am now.
Blog Name/Domain Name: What to write about? Is there a common theme?
I knew I wanted to write about science and food but also about some random cultural insights, technology and career. It took me a while to decide a name for my blog because I didn’t want to have a name that is too specific (e.g. Food&Science) or too general (e.g. Mai’s blog). There are many tools out there that randomly join your key words and generate names. You can check availability of the selected domain through these tools as well. Some examples are;
For example, when I type in Science and Food as key words, I get choices such as;
- DigitalScienceFood
- ScienceFoodCloud
- ClickScienceFood
It can be useful to get some new ideas you haven’t thought about.
This process was fun but I actually landed on Foods for Brain based on one of my Dropbox folders, Brain Food, where I kept interesting but irrelevant articles that I found during Ph.D. research. Each of our curious brain needs new stimulation (i.e. foods) to stay active and healthy!
WordPress or GitHub Pages & Jekyll?
According to Blogging Basics 101, almost half of bloggers are using WordPress.
Main reasons why so many people use WordPress seem to be;
- Easy to use and “free” (of course, with some restrictions)
- Many people use it, hence there are a lot of support forums
There are other reasons such as the speed of loading as mentioned in Blogging Basics 101, but the ease of use and support are probably the main reasons why many blogging newbies choose WordPress over others.
WHAT is and WHY GitHub Pages & Jekyll over WordPress?
First of all, GitHub is;
The world’s leading software development platform with version control using Git (Git is an open-source version control system started by Linus Torvalds, who created Linux). Developpers make constant changes when creating software, app, etc., and these changes should be tracked so that they can go back to where things went wrong. This is version control.
GitHub also allows open collaboration because people who are not in the development team can look and download codes and documentations. If you want to participate in the project, you pull the up-to-date version and push request to incorporate your changes.
Then, GitHub Pages turns your project on your GitHub account into a static website. If you have some projects on GitHub that you would like to showcase, it is very straightforward to host your “portfolio page” on GitHub Pages. Everything is on your GitHub account, nicely organized!
Jekyll is a static website generator, which is tightly bound to GitHub Pages. It takes text contents and turns into a nicely formatted HTML site. There are so many templates available on jekyllthemes.org so you have many options on how you want your site to look like!
Despite the popularity of WordPress, I chose to use GitHub Pages to host my blog site because;
- I can gain control & ownership on my contents
- It is completely free (except for a domain name, but that’s all)
- I already have a GitHub account
The first point is a double-edged sword; you need to know or will learn some HTML and CSS to have the power to control what you have. No pain, no gain!
By hosting your blog on GitHub Pages, what you make is yours, unlike the free version of WordPress.
Going into the point about the cost, you can actually start your blog without paying absolutely anything by following simple steps outlined on GitHub Pages but your domain name would not be pretty. It would be something like yourname.github.io.
Getting a domain can be as cheap as $2.99/year. I got mine through GoDaddy because I have used it before wihtout any troubles, and it offers cheap domain names. You can also look at a comparison of other options as showcased in wpbeginner.
Step-by-Step
- [This step can happen after step 6] Come up with a blog name and buy a domain name
- Pick a theme on
jekyllthemes.org - Fork the theme you picked so that you have the copy on your repo.
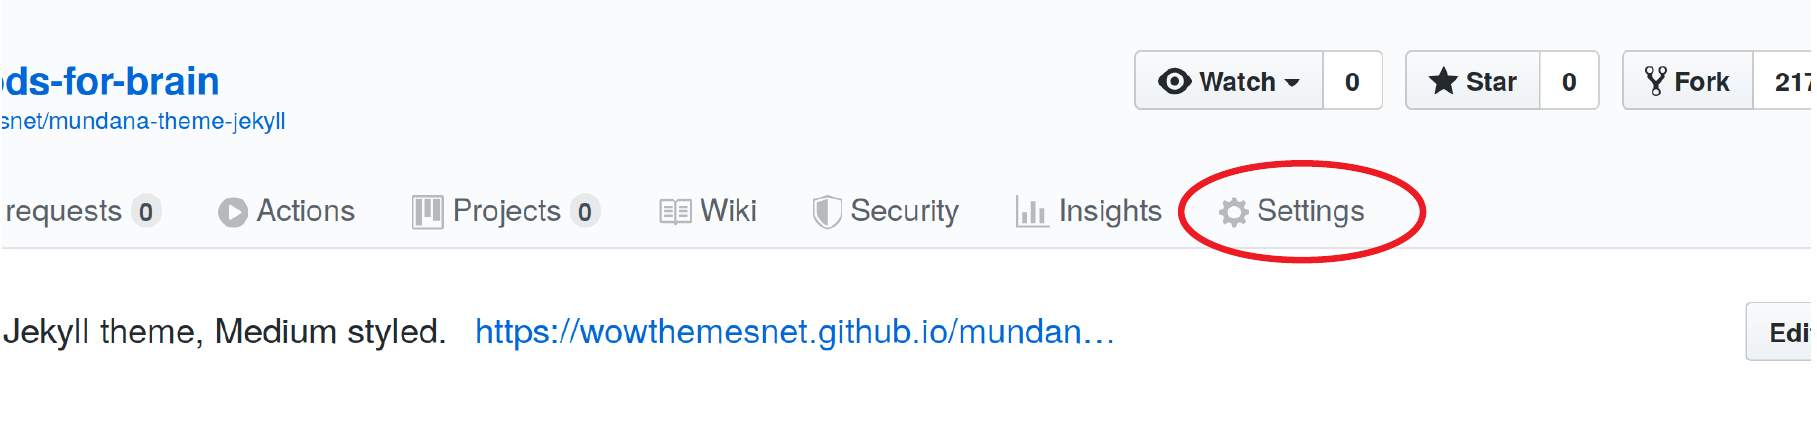
- Go into the Settings (circled in red below) and change your repository name from the name set by the theme creator. (in my case, I changed it from “mundana-theme-jekyll” to “foods-for-brain”)
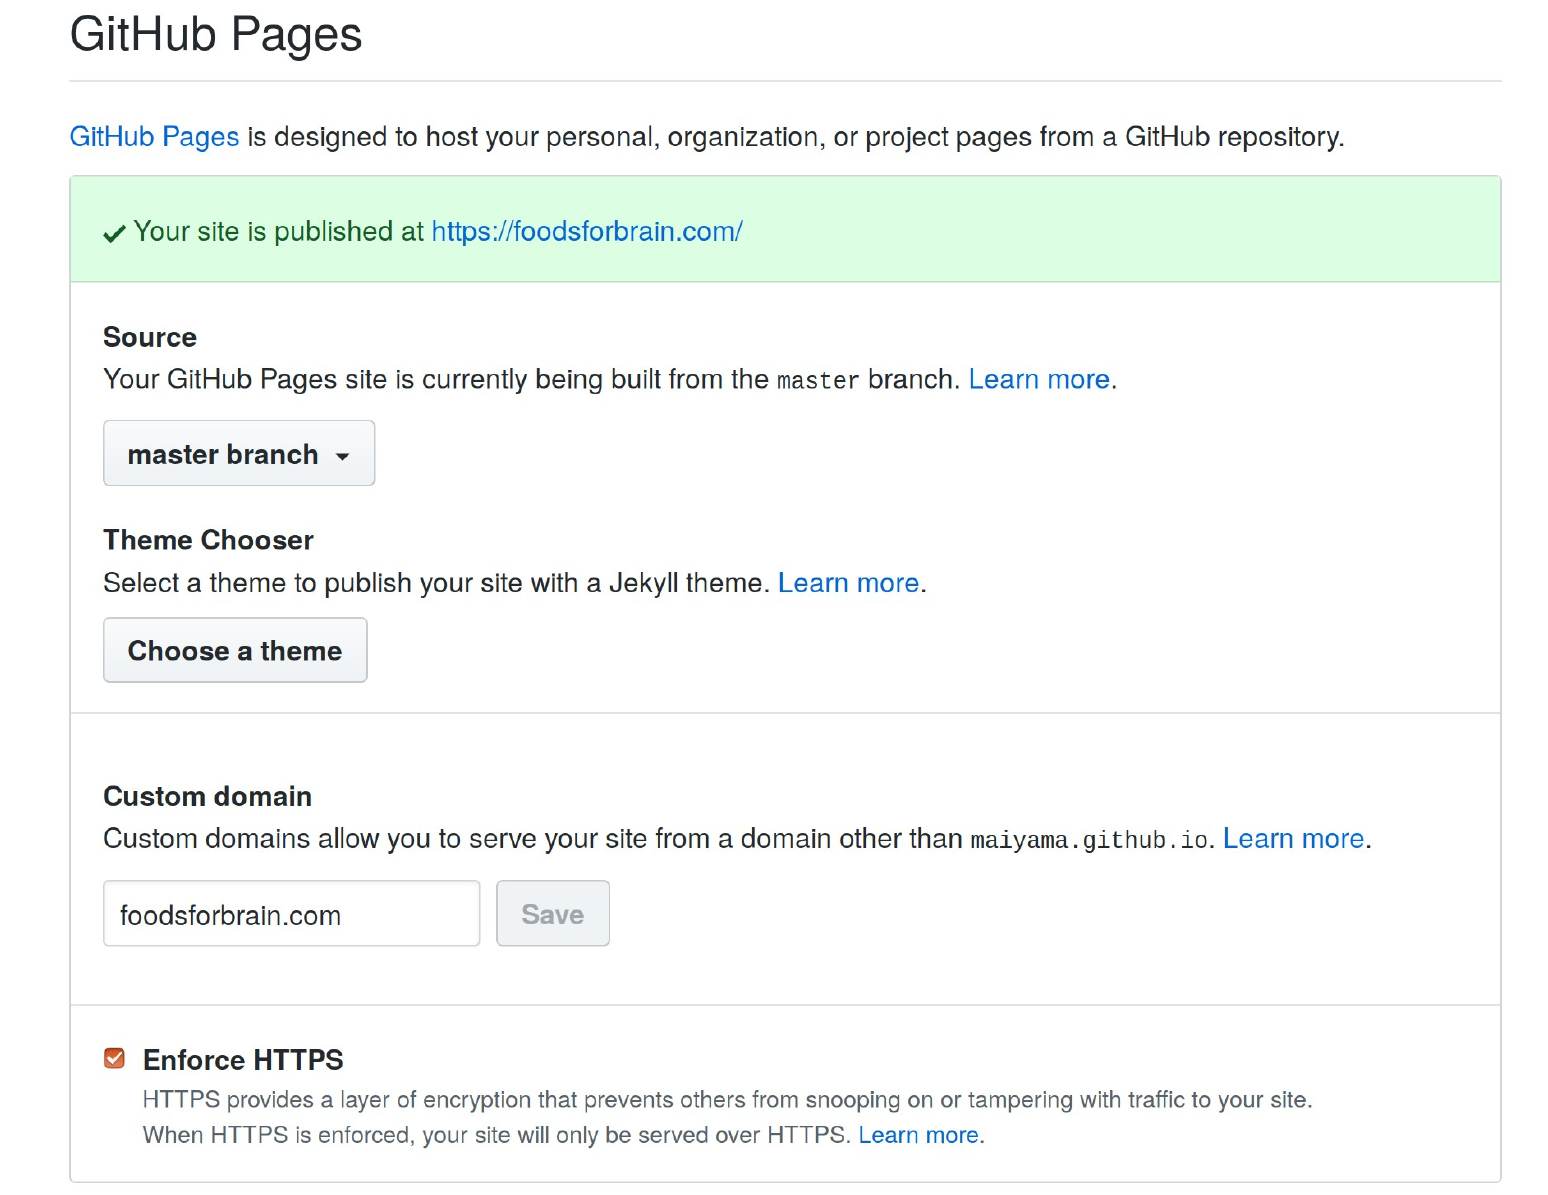
- Go down to GitHub Pages section. Change the Source from None to master branch if you are using the master branch.
- In the same section, add custom domain if you already got one, and make sure to check Enforce HTTPS If not, you can leave it as is.
That’s it for the first part. You already have your page with URL looking like yourname.github.io/your_repository. All the contents are the same as the template you got at this point and it is up to you to customize and populate the content!
Next: how to play with your content locally
It makes sense to be able to make changes on your site locally in your environment, instead of visiting your GitHub account directly, right?
By installing Ruby and Jekyll, you can deploy and browse your site locally on your computer as you make changes before publishing (i.e.pushing all the changes to your master branch)!
Jekyll offers a super helpful guide, and I simply followed it. It definitely helps to use Linux or Mac environment as Windows is not officially supported, but there is a way to get around it.
- Install Ruby (language used to write Jekyll) & Gems (code that allows functionalities such as converting Ruby object to JSON, Interacting with GitHub, etc.). Installation guide for different operating systems can be found here. I followed the steps for Ubuntu.
- Install Jekyll and bundler gems
gem install jekyll bundler - Create your local clone by clicling the green button that says Clone or download.
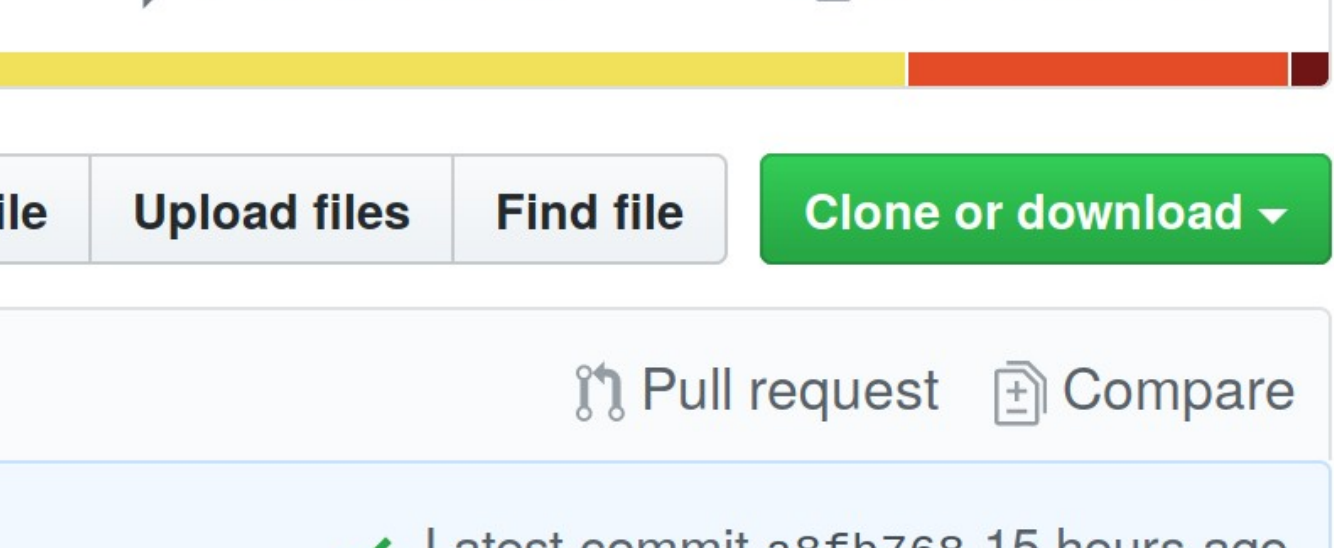
- Get the URL.
- Go to your teminal, change the current working directory to where you want the local copy to be and type in the following command with your URL. Now you should have a folder with the same name as your repository in the directory you specified.
git clone https://github.com/YOUR-USERNAME/YOUR-REPOSITORY - Create a new Jekyll site at your working directory
jekyll new YOUR-REPOSITORY - Change the directory into your blog site
- Build the site locally
bundle exec jekyll serve - Now, you should be able to browse your site locally
http://localhost:4000
Trouble shooting tips
- Check your jekyll and ruby version to see if they are properly installed
jekyll -v ruby -v bundler -v - Check Gemfile and Gemfile.lock and make sure version names are compatible with what you have, and there are no discrepancies among the settings. In my case, the Gemfile and Gemfile.lock that were already included in the theme had something that did not match with my jekyll version so I had to change it.
Next: set up a domain name
If you have decided to buy a domain and get more involved, the following steps that I took might be useful. My examples are based on GoDaddy interface but similar should apply to others.
- Get a domain
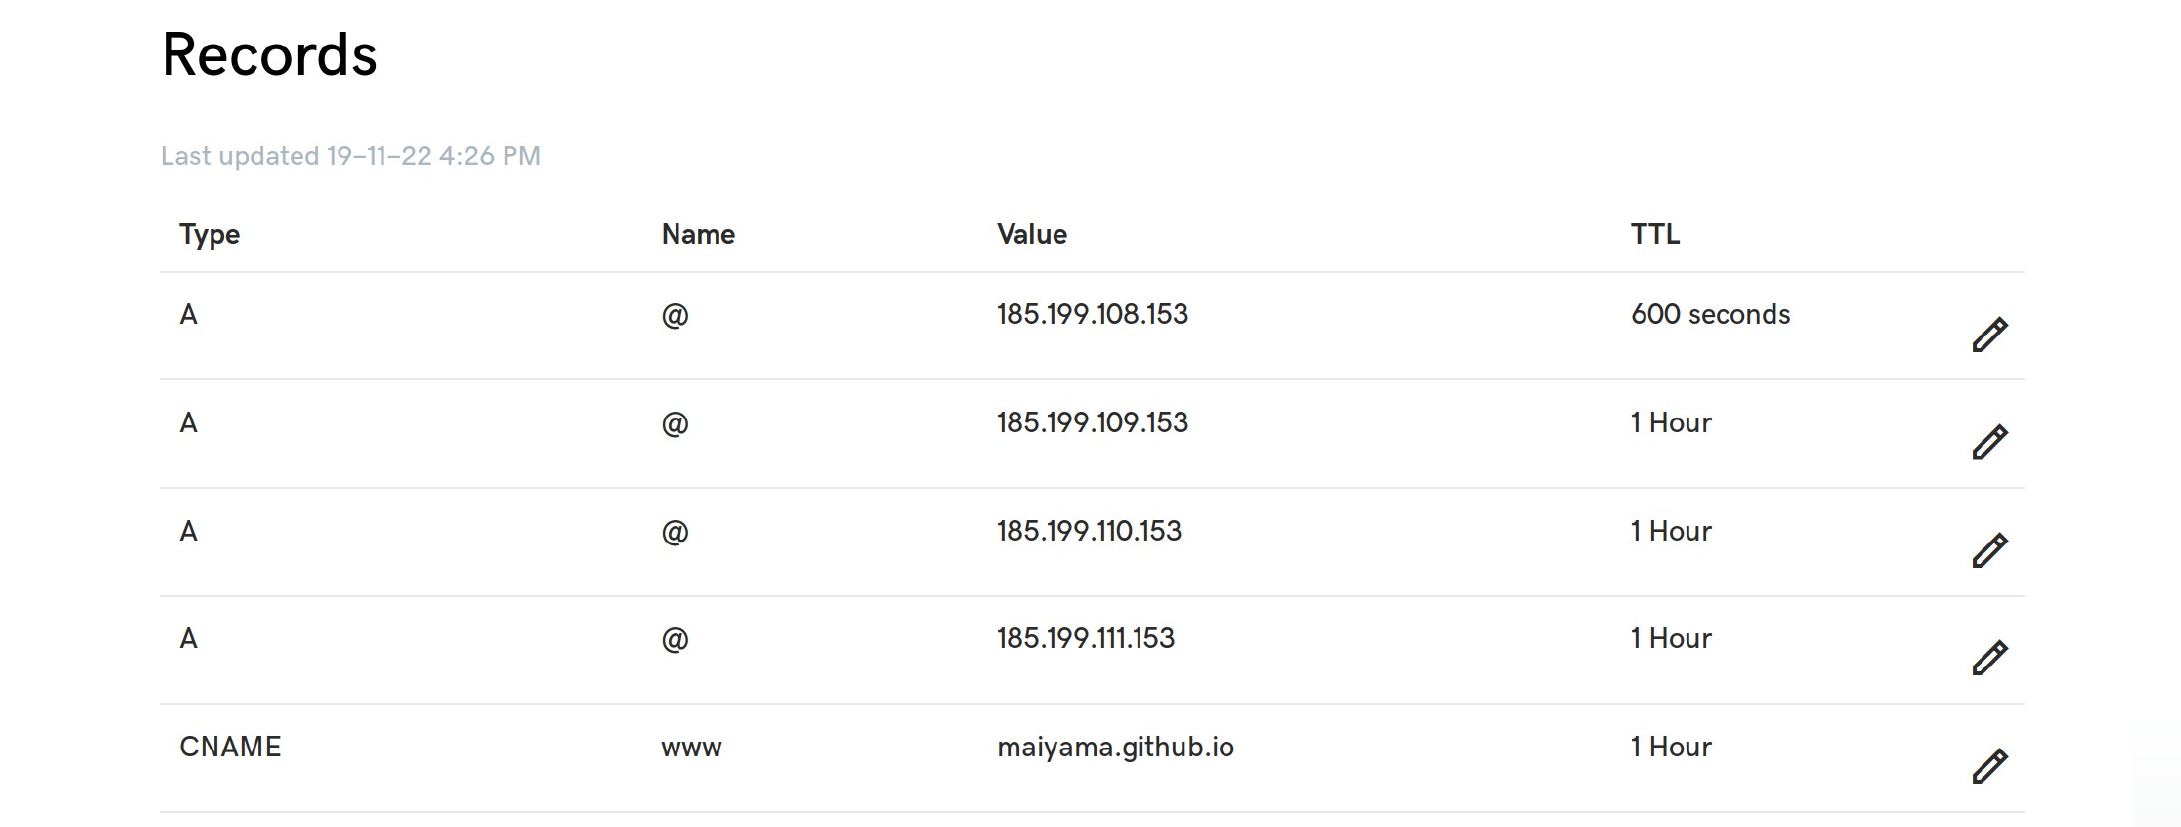
- At where you got the domain from, go to Manage DNS and add/change the record as shown below. Don’t worry about the order.
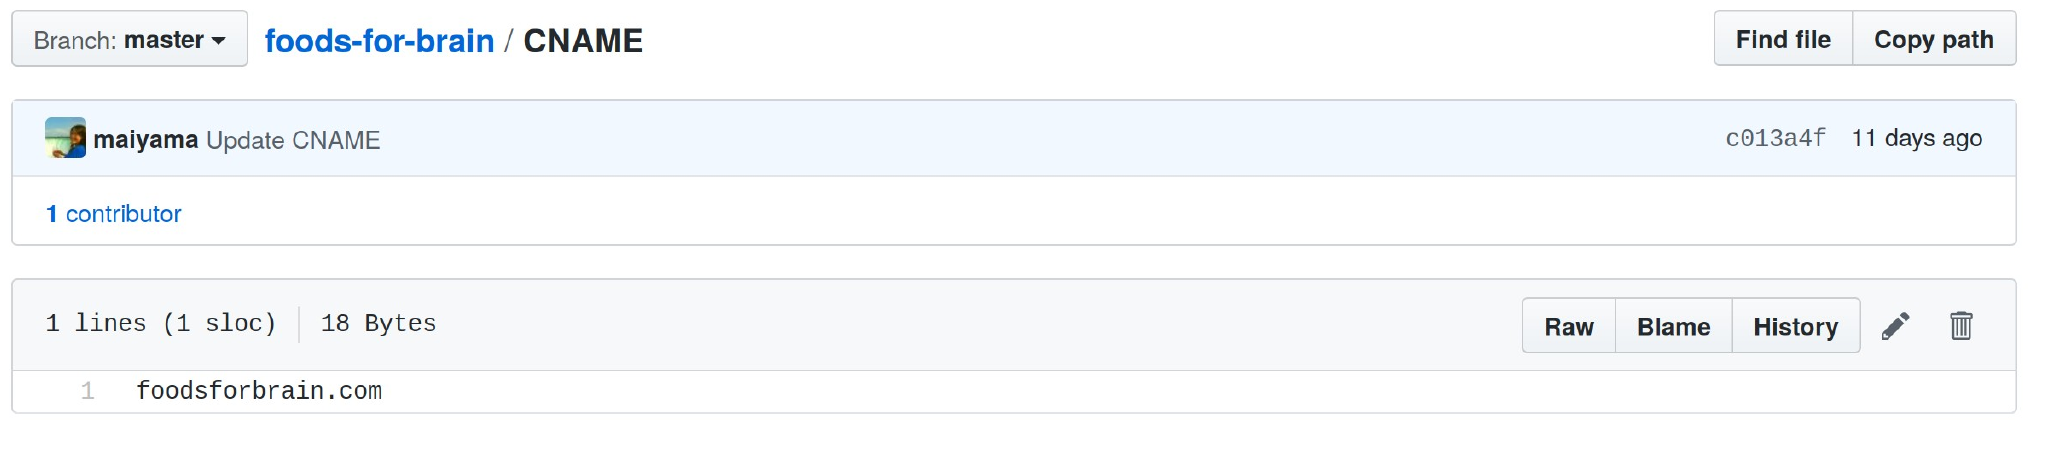
- Go back to your GitHub account, Settings, where you left off with in the step 5 of the last section. When you type in your custom domain and check Enforce HTTPS, there should be a file called CNAME automatically created in your main repository. DO NOT CHANGE IT! Mine looks like below.
This last step of configuring DNS settings and getting the HTTPS certificate may take some time. I think mine took about one day.
There are many helpful tips out there, and GitHub Pages also offers a guide to configure a custom domain. I found the tips offered by HACKERNOON very helpful.
Help! My site shows ‘404 Not Found’!
After getting everything set up, my site was running fine locally BUT not on the web. ‘Not Found’ page showed up as I typed in foodsforbrain.com.
It took me a while to figure out but changing the baseurl section on _config.yml file helped. It was originally baseurl: '/foods-for-brain' and I had to change it to url: 'https://foodsforbrain.com'.
Topics that I covered here were by no means comprehensive but I hope this post would be helpful to someone out there who is thinking about starting a blog site!

Credit for the title photo:
 Rutabagaスープと農作物の栄養価が歴史的に下がってるかもしれない話